

Android Guide
ProShot
“There is one thing the photograph must contain, the humanity of the moment”
Table of Contents
Intro
ProShot is a rich and powerful camera app filled with features, modes and more. It may seem overwhelming at first, but it is actually easy to master! This guide will teach you how to get the most out of ProShot, and share tips along the way. It assumes no prior photography or filmmaking experience, and can be read by users of all skill levels.
Viewfinder

The viewfinder is where the camera feed is shown. Here you can preview your scene, select focus and exposure points, and more. In addition, any changes to zoom or exposure compensation values will show at the top of the viewfinder.
Focus and exposure
To set the focus and exposure point, tap anywhere on the viewfinder. To reposition the point, drag the box anywhere you like. To reset, tap the box.
Zoom
To zoom, simply drag one finger up or down on the viewfinder.
Spot metering
The default exposure metering is center-weighted. To set it to spot metering, tap the AE button twice, once for AE-L, and again for AE spot metering. An AE box will appear on-screen that can be dragged anywhere. To reset, tap the AE button, or tap the exposure box.
Lens Selection
On devices with multiple cameras, the bottom-right of the viewfinder will show a lens selector where you can switch between available lenses. Some newer devices have “camera groups”, which allow for seamless transitions between lenses while zooming. For more information about camera groups and their limitations, please see the Technical Notes section.
X-Mode / Night Mode (Vendor Extensions)
On devices that support Vendor Extensions, an X-Mode button will show at the bottom-middle of the viewfinder. Tap this button to open the X-Mode menu and select an available X-Mode (Beauty, Bokeh, HDR, Night). If only one Vendor Extension is supported (for example, Night Mode), only that button will show. For more information about Vendor Extensions and their limitations, please see the Technical Notes section.
Image / Video Format
At the top-left of the Viewfinder is the image and video format button. Tap here to select the image or video format for the current Drive Mode. Here you can toggle between RAW and JPEG capture, or H.264 and H.265 video format.
Tip: Tap the zoom or exposure compensation labels to reset their value.
Top Bar
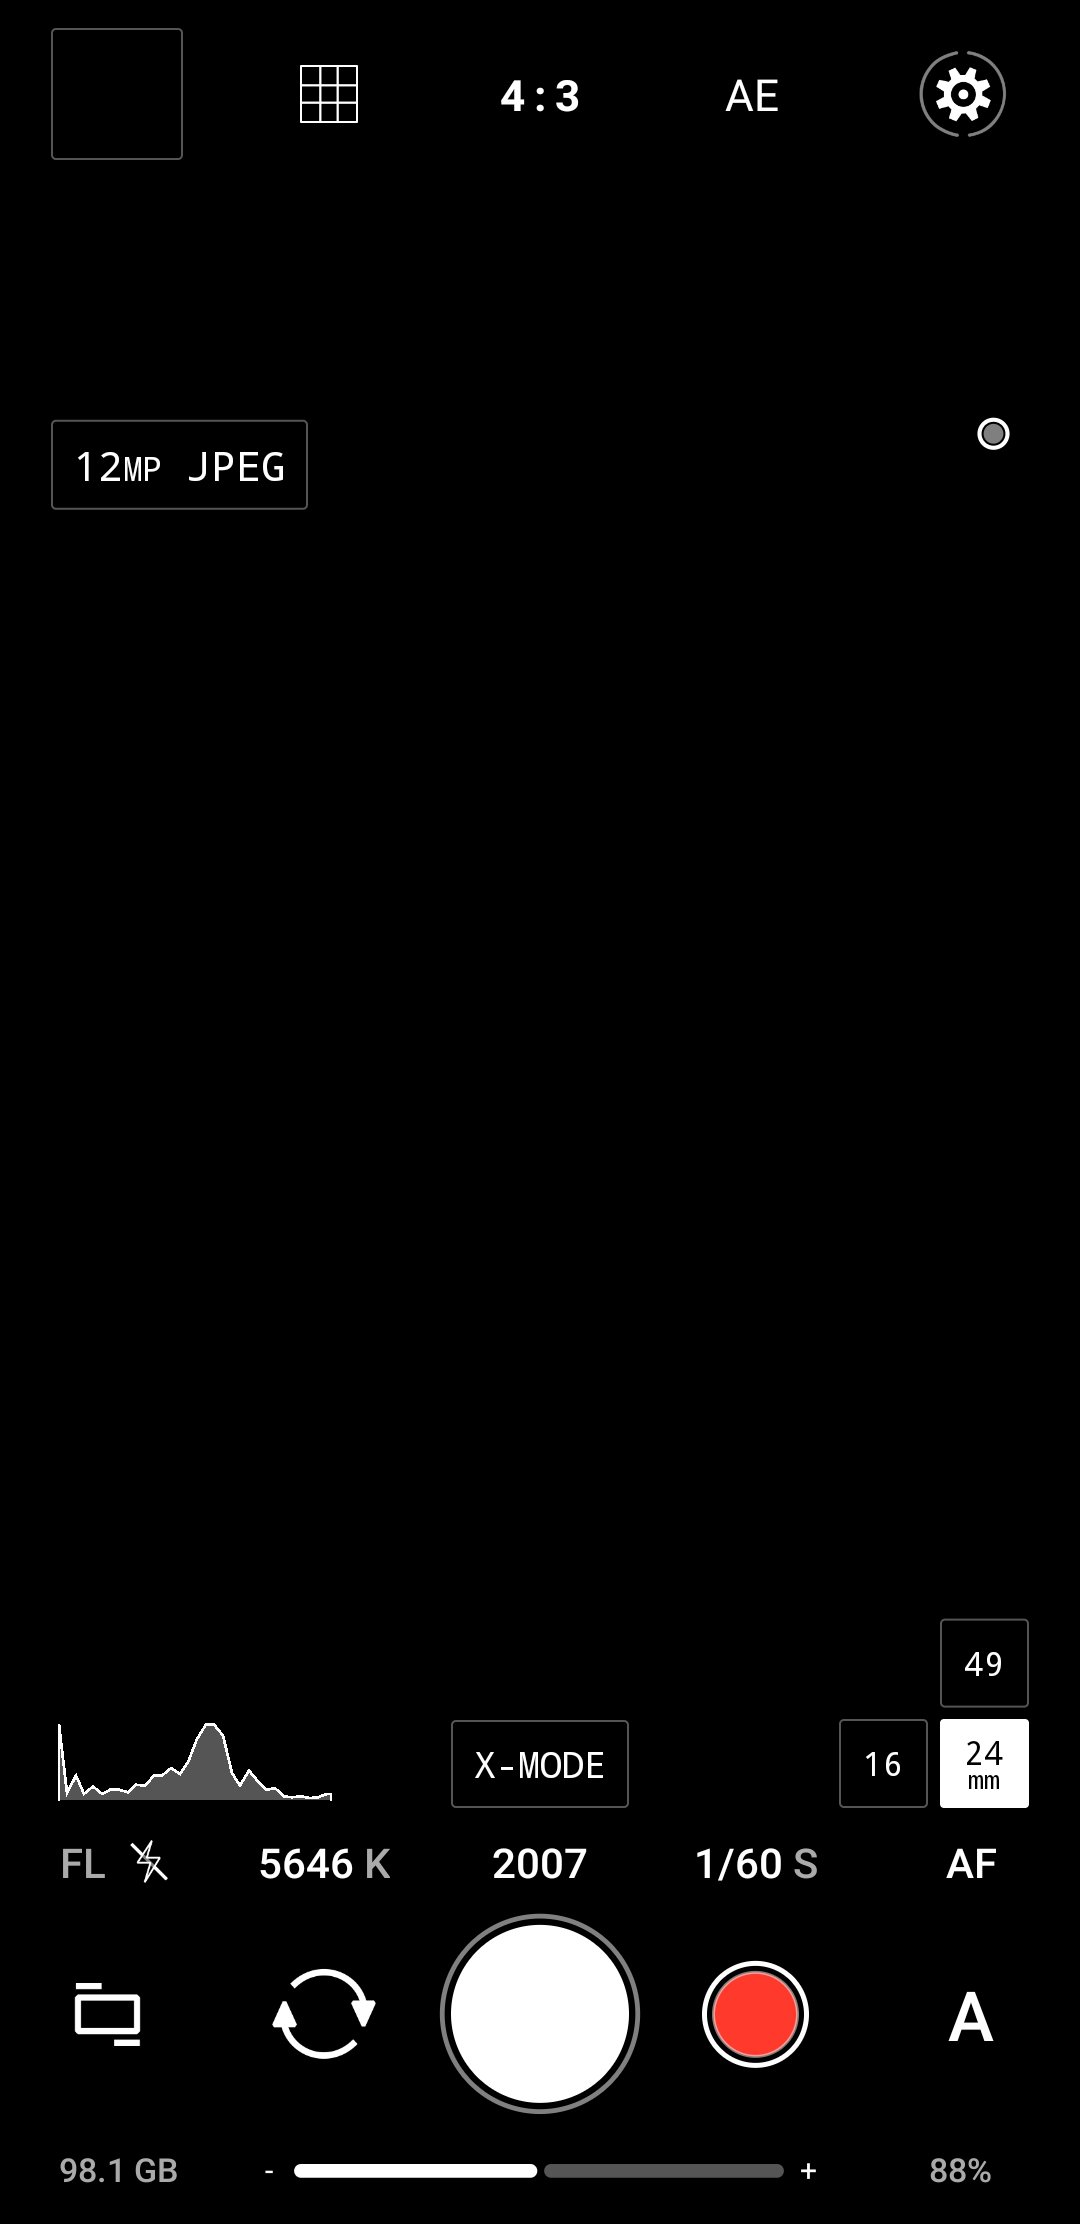
The Top Bar contains quick action items. In order from left to right:
Preview Image
This shows a preview of the most recently captured photo or video.
Grid Overlay
This toggles between grid options.
Aspect Ratio
This selects the aspect ratio. You can choose between 4:3, 16:9, 1:1 and C (custom aspect ratio). To modify the custom aspect ratio, press and hold the “C” button.
AE Button
This selects the AE mode (center-weighted, spot).
Settings
This opens the Settings panel, where you can access many of ProShot’s extra features such as horizon level, histogram, themes and more (more on the Settings Panel later).
Bottom Bar

The Bottom Bar contains access to many of ProShot’s camera settings.
At the top is a row of buttons. Tapping on any one will show controls for its related function including Flash, White Balance, ISO, Shutter Speed, and Focus.
Focus Peaking
The Focus menu has a button “PEAK” that toggles Focus Peaking. There are four Focus Peaking modes: Off, On, Peak MF (on when Manual Focus is enabled), and Peak MF-A (on only when Manual Focus is changing).
Below this row are the camera and mode dial buttons. From left to right: Drive Dial, front / rear camera toggle, shutter button, video record shortcut, and Camera Dial (more on Mode Dials in the next section).
Finally, at the very bottom of the bottom bar is the exposure compensation (brightness) slider, as well as storage space remaining and battery meter.
Tip: ProShot’s menu system is designed to keep related items grouped together. As shown in the image above, the button for Focus Peaking is found in the Focus menu.
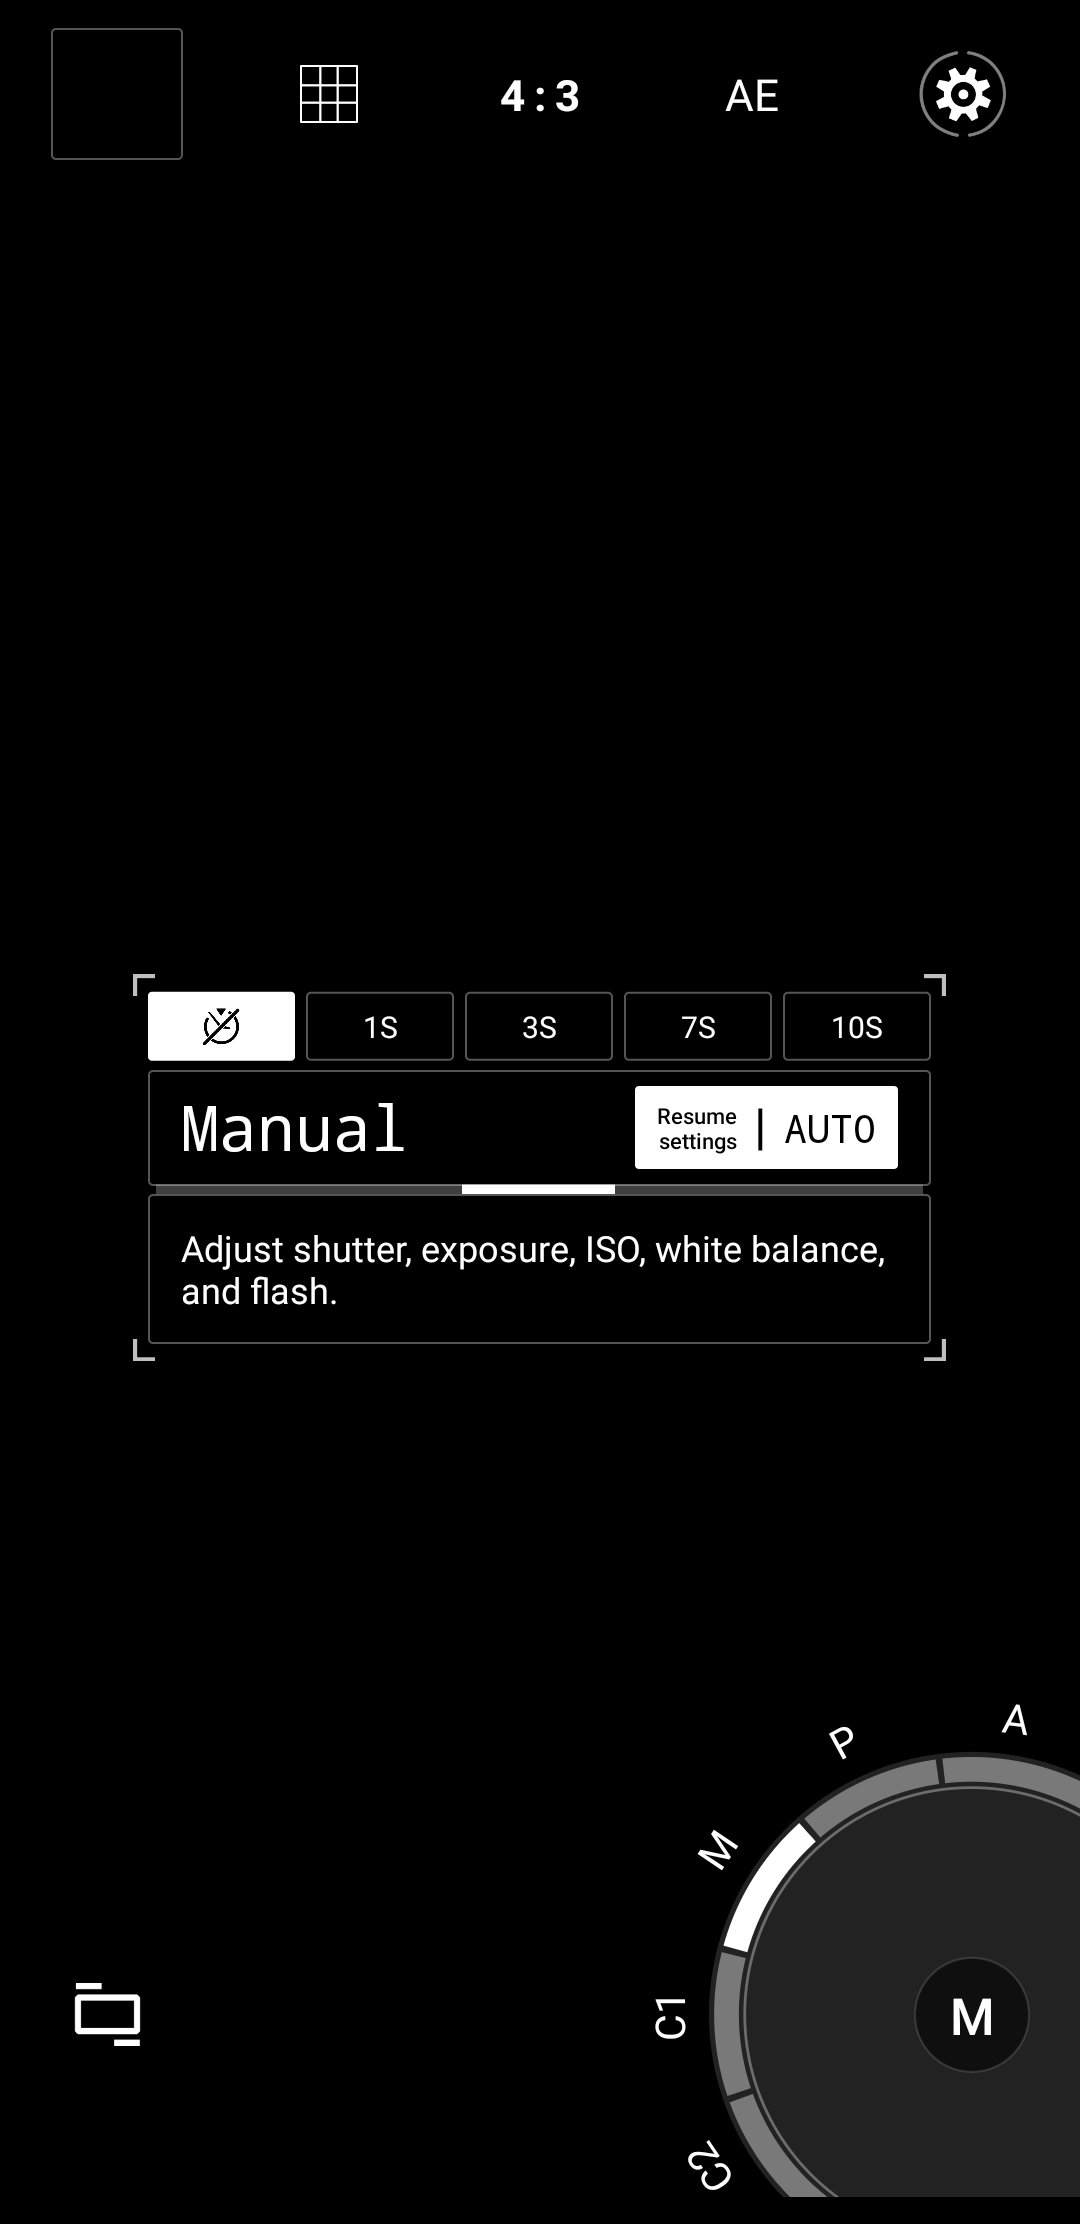
Camera Dial
The Camera Dial is modeled after a traditional DSLR mode dial and was the inspiration for ProShot’s UI. This allows you to quickly toggle between camera modes, including Auto, Program, Manual and two Custom Modes.
Auto Mode
Use this mode to capture great results in any situation, without needing to configure anything.
Program Mode
This semi-automatic mode allows you to set ISO and White Balance, while ProShot handles shutter speed adjustments. Use this when you want to keep ISO low for crisp photos, and don’t want to worry about full manual control.
Manual Mode
Use this mode when you wish to set ISO and Shutter Speed manually.
Custom Modes
Custom modes C1 and C2 allow you to save and recall your favorite camera settings. Any camera setting (EV, WB, ISO, Shutter and Focus) will be automatically saved when you make a change in one of these modes.
Resume Settings
This function controls how and if the Camera Mode / Camera Settings (EV, WB, ISO, Shutter Speed, and Manual Focus) are resumed after leaving and then returning to ProShot. OFF resets the Camera Mode / Camera Settings (Auto) every time you open the app. AUTO keep the Camera Mode / Camera Settings set for 10 minutes after leaving the app. If you return to the app after that time has passed, it will reset the Camera Mode / Settings to default. ON means the Camera Mode and Settings will stay set, even if you close the app and open it again.
Tip: ProShot can dynamically switch between camera modes. For example, in Auto Mode, selecting a shutter speed will seamlessly switch ProShot to Manual Mode. Setting the shutter speed back to auto will change the Camera Mode back to Auto.

Drive Dial
The Drive Dial is used to switch between ProShot’s drive modes, including Photo, Video, Slo-mo, Light Painting and Time-lapse.
Photo
Use this mode to take pictures. Here you can enable EV bracketing, and toggle Auto Enhance, which enables hardware-level post-processing that can enhance the color and dynamic range of your photos. On some devices this may also activate automatic HDR.
Video
Configure your video options here. Select video size, frame rate, bitrate, mic options, and electronic image stabilization (EIS). For important information about video and its limitations, please see the Technical Notes section.
Slo-mo
Configure your slo-mo options here. Select video size, frame rate, bitrate, mic options, and electronic image stabilization (EIS). For important information about slomo and its limitations, please see the Technical Notes section.
Light Painting
This is a special mode that allows you to paint with light. There are four modes: Light, Water, Stars and Bulb. Light is for capturing light trails. Water is useful for capturing running water, even during the day without the need for an ND filter. Stars is for capturing star trails at night. And Bulb simulates Bulb mode (long exposure photography) as found on traditional DSLRs. A tripod is highly recommended.
Timelapse
This is ProShot’s timelapse mode. You can adjust timelapse duration, interval, and how frames are saved, either individually like an intervalometer, or as a movie.

Settings Panel
This panel offers quick access to many of ProShot’s features.

Storage Location
SHARP
Sharpness

Screen Brightness
LEVEL
Horizon Level

Histogram

OIS
NR
Noise Reduction
Tag with GPS

Rotation Lock
Hacks
Some devices may hide manual controls or RAW capture from third party apps. These hacks were developed to get around those limitations. If your device cannot adjust WB, ISO, Shutter, Manual Focus, or capture RAW photos, one of these hacks may help. Please note: this may cause instability within the app and require a reinstall.
Theme
Change the theme of the UI.
Storage Location
Please see the Technical Notes below for more info about custom storage location.
Technical Notes
This section contains technical notes regarding select ProShot features and the Android Camera 2 API.
Camera Groups
On newer devices, multiple cameras may be recognized as “camera groups”. These groups allow for the seamless switching between cameras based on zoom. You can customize how these lenses are selected by changing the Lens Mode in the Customize Panel.
High speed video and slo-mo (48 fps - 240 fps)
On Android, all video captured above 30fps require a special pipeline called the Constrained High Speed Capture Session. This pipeline unfortunately has some issues. ProShot does its best to get around the bugs affecting this pipeline, but it is ultimately up to the device manufacturer to ensure that their code is stable for use in third party apps.
Vendor Extensions (X-MODE)
Vendor Extensions are special modes (Beauty, Bokeh, HDR, Night) created by the device manufacturer for use in third party apps such as ProShot. These are highly complex capture pipelines involving computational photography to produce images beyond what the camera can do with a single frame. In these modes, manual control, zoom and RAW capture are not available. Only select devices have Vendor Extension support at this time but the list is constantly growing and we hope to see more widespread adoption in the near future.
Custom save location and video
On some devices, videos saved to a custom folder may not show up in ProShot’s camera roll. Please note they are still saved in your desired location, but may only be visible in the system’s gallery app. We hope to address this bug soon.
Video playback in ProShot’s camera roll
On some devices, extremely high bitrate or high frame rate video playback may not function or appear choppy in ProShot’s camera roll. In these cases it may be best to review the playback in a dedicated photo app such as Google Photos.
Frequently Asked Questions
This section addresses commonly asked questions.
-
Glad you asked! Eddie (ProShot’s developer) unfortunately had a medical emergency in 2024 that made him unable to work for most of that year. Development on 9.0 resumed in 2025, and is now targeted for late Fall / early Winter 2025. ProShot will still be receiving regular updates, fixes and feature additions in the run-up to the 9.0 launch.
-
Almost all Android devices come with fixed aperture lenses, so aperture adjustment is not possible.
-
Yes, the option to mute the shutter sound is found in the Customize Panel.
-
Some device manufacturers block access to auxiliary cameras, only allowing them to work in their own apps. ProShot has code to get around these restrictions, but it may not work in all cases. If you are unable to use all cameras, please contact your device manufacturer and request they open access to third party apps.
-
Some manufacturers block access to higher resolution outputs. If you are unable to capture at higher resolutions, please contact your device manufacturer and request they open access to third party apps.
-
The manufacturer is blocking access to higher frame rates. If you are unable to capture at higher frame rates, please contact your device manufacturer and request they open access to third party apps.
-
The Camera2 API is Android’s API (Application Programming Interface) for communicating with the camera hardware. It allows apps like ProShot to offer advanced features such as full manual controls, focus peaking, and more. The API was introduced in Android 5.0, and nearly every modern Android device now supports it.
-
Image Quality
On some newer Pixel devices, the image quality may be degraded with either the ENHANCE or SHARP options enabled (found in the Photo menu and Settings panel, respectively). You may need to experiment with disabling / enabling these items to see which combination works best for your device. This is unfortunately a bug in the Pixel’s firmware, and something only Google can fix. -
We’d love to! Please send an email to support@riseupgames.com.
If you have any other questions or require assistance, we’d be glad to help. Please send an email to support@riseupgames.com.

